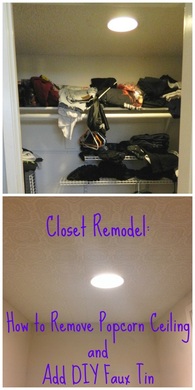
Kris and I have been busy bees lately working on our first big project, remodeling the black hole also known as our closet. So here's the thing, I moved in with Kris temporarily for three weeks back in September. It was great, except there was literally no room for any of my things, especially my clothes. When we started talking about living together recently, my first concern was making room for me and my stuff. That's how the remodeling, DIYing and making over of the house started. And consequently this blog was born to chronicle our journey. Want to see what's happening in our black hole?
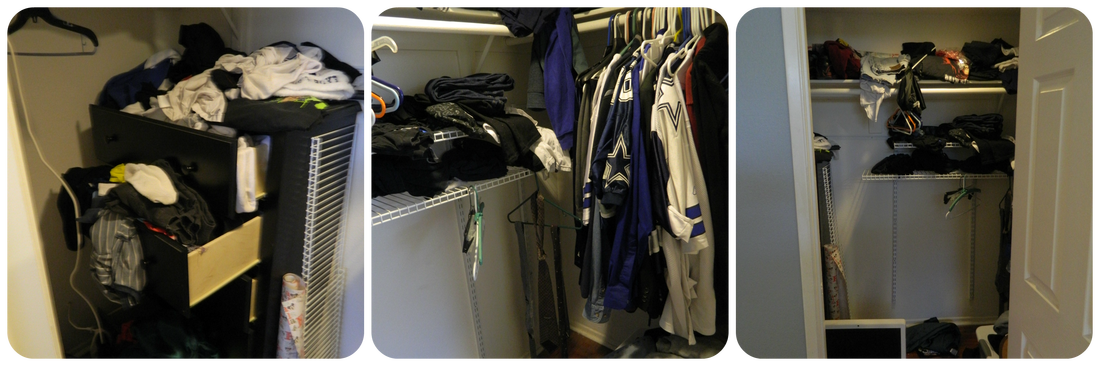
Here's proof that our closet was a black hole, was a black hole. I emphasize the was because that's in the past and will (hopefully) never happen again.
To ensure that our closet doesn't become a pit of unorganization (is that even a thing?) we went onto ClosetMaid's website and used their free closet organizer creator. It was awesome. We just put in our closet dimensions and they gave us a bunch of options to chose from. Once we picked the one we liked the most, it gave us a super simple shopping list. The one we picked looks like this.

We completely gutted the closet to make room for our shiny new system. And by we, I mean Kris did it. "We" then removed the yucky popcorn ceiling, which was much easier (and messier) than we thought it would be.
How to Remove Popcorn Ceiling
Supplies list:
Step two: Put plastic on the floor to catch the popcorn texture when it falls.
Step three: Spray a small patch of ceiling with water. You want to work in sections so the ceiling doesn't start to dry.
Step four: Let the water soak for a couple minutes.
Step five: Scrape your popcorn-hating heart out!
Step six: If there are any holes, cracks or dents fill them in with joint compound and let it dry
Step seven: Sand the areas you added joint compound and any other areas that need perfecting.
Step eight: Once you are satisfied that the ceiling is perfectly flat (or if you're like me flat enough) paint a couple coats of the drywall primer.
The guy at home depot told me I needed primer with pva since we were painting naked drywall. I don't know about these things, but I trust him.
And don't forget the most important step of all...
Step nine: take in a nice deep breath and let it out slowly while you take in the beauty of your nice popcorn free ceiling. You can even take it a step further and eat a bowl of popcorn because that's where popcorn belongs, in my tummy, not on my ceilings.
Kelly at View Along the Way took a very helpful (and cute) video of these steps. See that video here
Once your space is all primed and ready you can do what you please with it.
We chose to put up a faux tin ceiling, but you could simply paint it.
- scraper
- squirt bottle (for a small space you can use a hand held type, but you probably need the kind with a spray wand for a normal sized room)
- joint compound
- putty knife
- plastic
- sand paper
- pva drywall primer
Step two: Put plastic on the floor to catch the popcorn texture when it falls.
Step three: Spray a small patch of ceiling with water. You want to work in sections so the ceiling doesn't start to dry.
Step four: Let the water soak for a couple minutes.
Step five: Scrape your popcorn-hating heart out!
Step six: If there are any holes, cracks or dents fill them in with joint compound and let it dry
Step seven: Sand the areas you added joint compound and any other areas that need perfecting.
Step eight: Once you are satisfied that the ceiling is perfectly flat (or if you're like me flat enough) paint a couple coats of the drywall primer.
The guy at home depot told me I needed primer with pva since we were painting naked drywall. I don't know about these things, but I trust him.
And don't forget the most important step of all...
Step nine: take in a nice deep breath and let it out slowly while you take in the beauty of your nice popcorn free ceiling. You can even take it a step further and eat a bowl of popcorn because that's where popcorn belongs, in my tummy, not on my ceilings.
Kelly at View Along the Way took a very helpful (and cute) video of these steps. See that video here
Once your space is all primed and ready you can do what you please with it.
We chose to put up a faux tin ceiling, but you could simply paint it.
How to Install a Faux Tin Ceiling
Supplies list
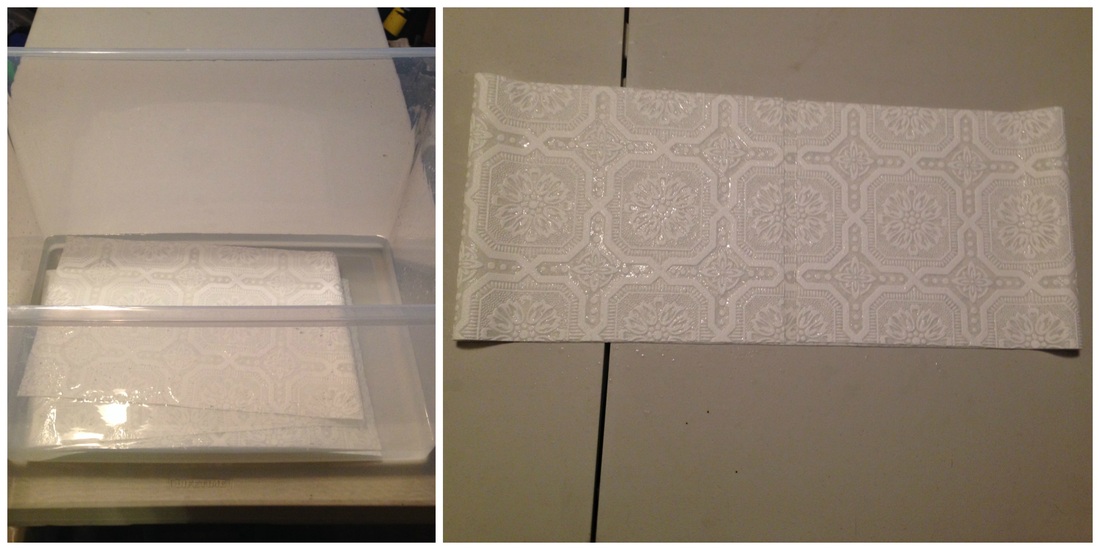
- paintable wallpaper (I used Allen + Roth brand from Lowe's)
- wall paper glue
- glue roller (ours didn't work, so we just used a paint brush we had on hand)
- plastic tub to soak wall paper (our tub wasn't reachable, but you could always use your bathtub)
- razor
- straight edge
- tape measure
- pencil
- clean paint roller
- clean sponge
- Measure the first wall (mine was 44.5 in)
- Divide that in half (so in my case 22.25 in)
- Mark the center point of the wall
- Do the same on the opposite wall (it should be the same)
- Make a straight line across the ceiling to connect your two center point marks
- Repeat these steps on the other two walls
- It should end up looking like a big plus sign in the middle of your ceiling
- Add three inches to the length you need (my wall is 44.5 inches so I measured my wallpaper to be 48.5 inches long)
- Measure and mark each side of the wallpaper
- Use a straight edge to connect each mark
- Follow this straight line with your razor. I used a box cutter
- Roll the wallpaper with the pattern facing inward and the glue facing out
- submerge it in the water for the required time (mine required 30 secs)
- Lay the paper flat with the glue facing up
- Fold one side in toward the center so that the glue is touching
- Repeat with other side and let it sit like this for about 5 minutes
Step four: Paste your wallpaper onto the ceiling (it helps tremendously to have two people for this part)
- Have one person hold the wallpaper to the ceiling while the other person uses the clean paint roller to smooth out the paper
- Make sure to remove any wrinkles or bubbles
- Use your fingers to press the paper firmly into the edge of the ceiling
- Use the razor to cut the excess paper off each side
- Repeat steps two to four until your entire ceiling is covered.
- Make sure to line up the pattern as you paste each new piece
- Use a damp sponge to remove excess glue on the walls and between each seam.
| I used a super sharp batman knife because I'm cool like that. No, but really my box cutter was old. It ended up dragging and ripping the paper, so I recommend using a brand new razor. | 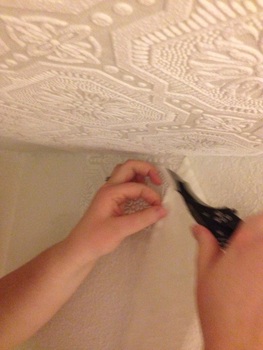 |
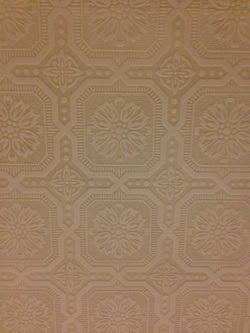
Here's a close up of the naked wallpaper. After you paste it up on the ceiling you have to wait at least 24 hours before you can paint it your desired color. After researching some on the internet, I chose Rustoleum Aluminum.
Overall, this project wasn't too bad. It was mostly just a gnarly shoulder workout. I'll be honest because Kris will probably tell on me anyway, I was pretty whiny when we first started. But after the second sheet we got into a pretty good groove. After that it wasn't so bad. Except the part where he dropped the wallpaper glue side down onto my neck! Even still, hiccups and all it was totally worth it.
Stay tuned to see how the closet looks after we're done painting it and installing our spiffy new organizer.

 RSS Feed